Are you wondering how to change mic sensitivity in Windows so you can improve the quality of your recordings, conference calls, or live streams? Maybe you need to turn up the mic sensitivity to better pick up your voice. Or maybe the microphone device is too hot, and you need to reduce the sensitivity. No matter the type of recording you’re doing, your mic sensitivity can determine things like the clarity of your sound capture, your ability to apply post-processing, and more.
As an experienced eLearning creator, I’ve learned that the quality of your audio can make or break the effectiveness of your digital content.
In this article, I’ll guide you through the simple yet crucial steps to adjust your microphone sensitivity in Windows to ensure your recordings are clear and free from unwanted background noise or distortions. Whether you’re recording voiceovers for tutorials, lectures, interactive modules, or any other purpose, mastering this aspect of audio setup will significantly enhance the overall quality of your educational offerings.
A Primer on Mic Sensitivity
Mic sensitivity is the degree to which a capsule picks up sound.
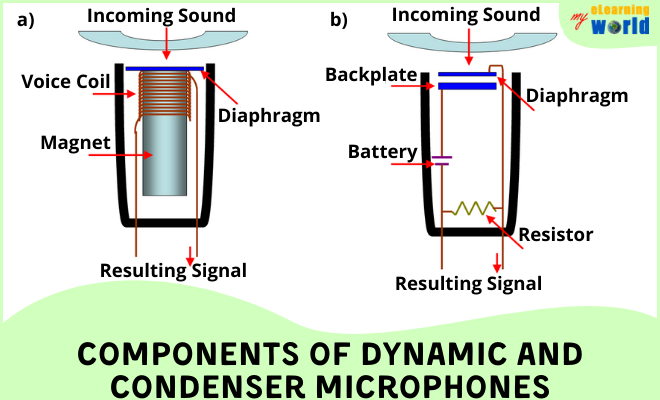
A microphone capsule is usually comprised of internal components like a diaphragm and solid plate that measure changes in air pressure through sound waves. A sensitive device will have a diaphragm that vibrates easily, meaning it will measure smaller changes in air pressure resulting in more sensitivity.
By and large, condenser mics (b) tend to be more sensitive because they employ this type of internal design. As a result, condenser models are usually used in studio recording environments to capture natural sounds and sounds that require detail.
Dynamic mics (a), on the other hand, employ components that are less conducive to movement and electricity. As such, they tend to be less sensitive and are suitable for live recording and the audio recording of louder sounds.
One important thing to note about microphone sensitivity is that there is no way to increase or decrease sensitivity after a sound has been recorded.
While there are software solutions available that can clean up or restore damaged sound files, the audio has been recorded at a certain level. You can’t fix mic sensitivity after the fact, so what you’ve recorded is what you’ve recorded.
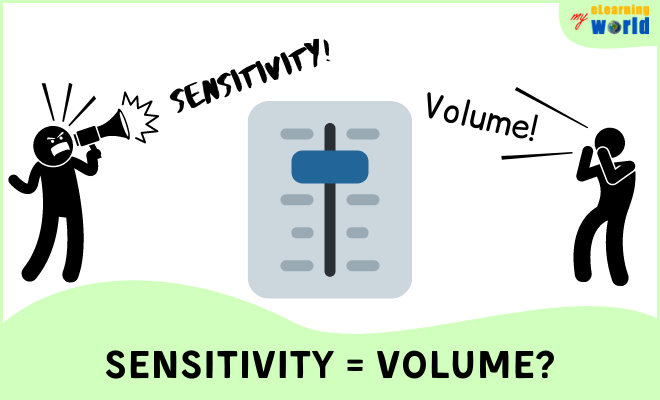
This is why it’s a good idea to understand the difference between mic volume and mic sensitivity in order to get a recording right the first time.
Microphone Volume vs Sensitivity
In the world of recording, there are plenty of times where certain jargon gets used in the wrong context. For the most part, this doesn’t cause too many issues for seasoned veterans, but if you’re just starting out in recording, confusing terms with one another can lead to problems in a hurry.
An example of this can be found when talking about mic sensitivity and microphone volume or gain. These terms may get used interchangeably as they relate to how loud a sound is during the recording and playback processes, but they have very different meanings.
If you’re confused about these terms, you may not know how to adjust microphone sensitivity settings or select the right mic for your needs based on sensitivity. In doing this, you may be adding more gain and causing distortion and clipping in your sound capture.
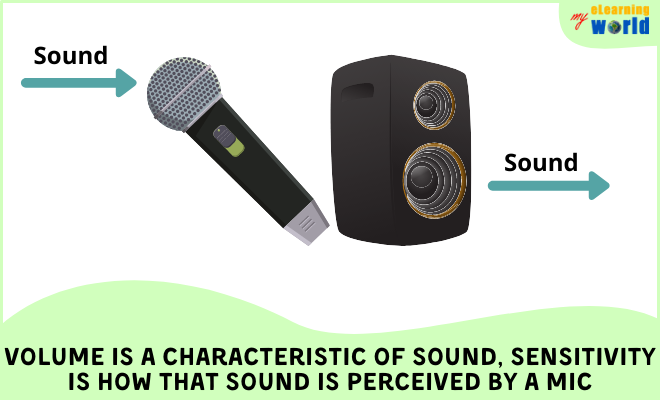
Volume can be understood as how loud a sound is perceived based on the magnitude of the sound waves of an audio source.
In simpler terms, volume is how loud a sound is to the listener.
If you’re standing in front of a jet engine when a plane takes off, you’re going to perceive the sound as much louder than someone who hears the same sound a mile away. This is because volume is about perception, and perception of sound is usually based on proximity to a sound source and how easily the sound waves can be captured by the listener.
Sensitivity, on the other hand, is based on the point at which sound waves begin to be perceived.
You can compare sensitivity in recording gear to how your ear drums work.
When you hear a sound, you only perceive the sound and its volume because sound waves cause your ear drum to vibrate. These vibrations are translated by your brain into sound. The stronger the vibrations and the closer you are to a sound source, the more volume is perceived.
So, mic sensitivity is based on how easily it perceives volume.
It perceives volume by using internal components like diaphragms that measure sound waves. The diaphragm can be thought of as your ear drum.
A very sensitive device will have a thin diaphragm that reacts to sound waves easily, but a less sensitive model will require sound waves to have a greater magnitude in order to register.
This is also why you can be farther away from a sensitive microphone and still capture audio, but you need to be loud and close to a dynamic one to get the same result.
Adding more volume or gain to a mic input signal only amplifies the perceived sound. It doesn’t actually make the device itself more sensitive to picking up sound.
Can You Change Mic Sensitivity?
For the most part, sensitivity is based on how the microphone was manufactured.
Typically, the mic sensitivity can only be altered by changing its polar pattern.
The polar pattern determines which part of the capsule is active and at what angle. Ultimately, this can change which areas of a capsule are energized to determine where sound sensitivity will be greatest and from which direction.
While you may not have many options to fix mic sensitivity, software can be used to control the volume input of most microphones in Windows to achieve greater control over gain levels. This emulates a change to sensitivity by reducing the potential for a mic to clip and distort recordings, allowing you to record a whisper and turn up the volume to make the sound equal to a yell.
Some sound cards and audio driver enhancements may also give you options to employ noise cancellation effects in the recording path.
How to Adjust Microphone Sensitivity Settings in Windows 10
Windows 10 offers a number of sound control features for audio professionals and beginners alike.
Unfortunately, failing to properly configure and fix mic sensitivity (actually, gain) in Windows 10 can lead to recordings that suffer from background noise, unwanted breath noises, sound pop-in, and other audio issues.
Thankfully, you can adjust mic sensitivity (gain) in Windows 10 by following these simple steps:
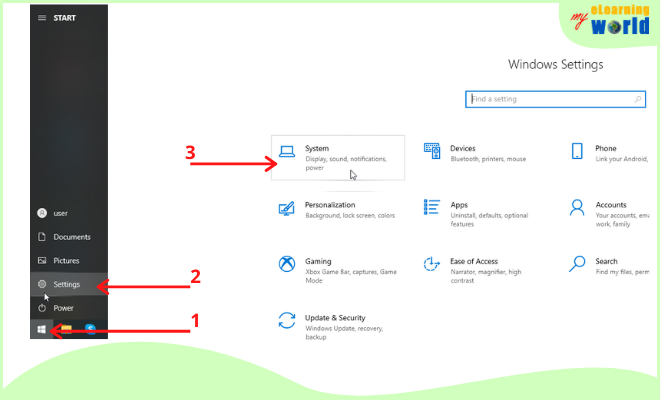
- Left-click on the “Start” button on your desktop home screen. This button looks like the Windows logo and is usually located in the bottom left of the home screen by default.
- Select “Settings” by left-clicking on the gear icon in the list that appears.
- You then want to left-click on “System” to bring up a list of adjustable system settings.
- Select “Sound” from the list on the left.
- Under the “Input” section, make sure your preferred mic is selected as the current input device.
- Left-click on “Device Properties”.
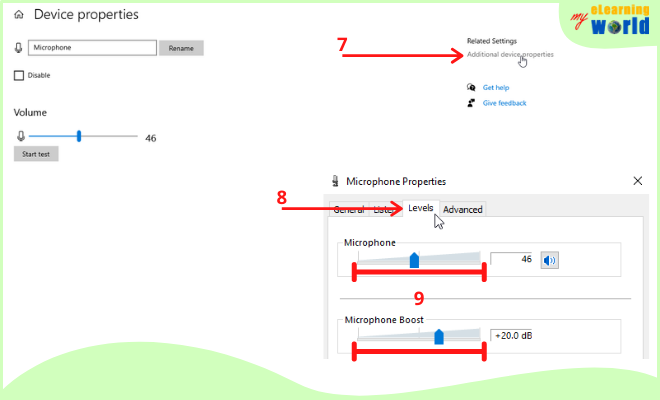
- Left-click on “Additional Device Properties” which can be found on the right side of the screen.
- This will open a new microphone properties window with options located in various tabs. Left-click on the option for “Levels”.
- Here, you will have the ability to change the microphone level and possibly a microphone boost setting that can determine the volume of your mic signal coming into your computer.
Please note that your specific device may or may not have the ability to change all of the settings listed above. Some audio drivers and audio processing units will have their own proprietary settings. If you are unable to find settings to make changes to your microphone input or sensitivity, please contact your mic manufacturer for more details.
How to Reduce Background Noise and Buzzing in Windows 10
You may also be able to reduce background noise and buzzing in your microphone by ensuring that all cords are connected properly. A poorly connected or damaged cable can cause a connection not to be grounded properly, and this can lead to a buzzing in your sound output from the mic.
Some noise cancellation enhancements may also be available depending on your audio driver and sound card. These are usually proprietary add-ons that are accessed through a separate control panel that gets installed when you install your micropone drivers.
How to Check the Driver
If you want to know more details about the driver that is controlling your mic, you can check it by:
- Follow steps 1-7 as listed above.
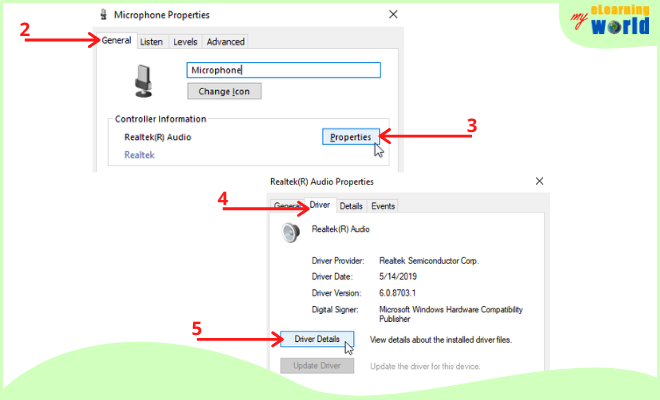
- Instead of selecting “Levels”, make sure you’re on the “General” tab.
- Left-click on “Properties” in the “Controller Information” section. This will open a new window.
- Left-click on “Driver” in the tabs provided. This will display information about the audio driver controlling your selected mic.
- You can also select “Driver Details” to get more in-depth information about the driver and its associated files.
If you have gone through all of the steps provided above to adjust sound settings, utilize enhancements and check the audio driver, but you’re still experiencing problems with microphone gain and sensitivity, you can run the Troubleshooter to have Windows automatically check for hardware and software problems.
How to Run the Troubleshooter
- Follow steps 1-4 as described above for accessing the “Sound” settings.
- Find the input device you want to troubleshoot and make sure it is selected in the drop-down menu.
- Left-click the button that reads “Troubleshoot” under the “Input” section.
- Follow the prompts. Windows will provide feedback and will attempt to automatically repair any problems it finds.
How to Change Mic Sensitivity in Windows 7
Although Windows 7 is a bit of an older version of the operating system, it is still used by many people across the world due to its efficient features, including its sound settings.
If you’re using Windows 7 to record and edit audio, you’ll be happy to know that you can also adjust mic sensitivity (gain) with ease.
Below are some easy steps you can take to fix mic sensitivity settings (gain) in Windows 7:
- Left-click on the “Start” button from your desktop home screen. This is the icon that looks like the Windows logo and is located in the bottom left corner of your home screen by default.
- Type “Sound” into the search bar.
- Choose “Sound” from the list “Control Panel”.
- In the window that opens, look for the tab labeled “Recording”. Left-click this option to see a list of audio input devices connected to your computer. The item with a green checkmark is the enabled input device.
- Left-click on the device you want to change.
- Once the item is highlighted, left-click on “Properties” in the bottom right of the “Sound” settings window.
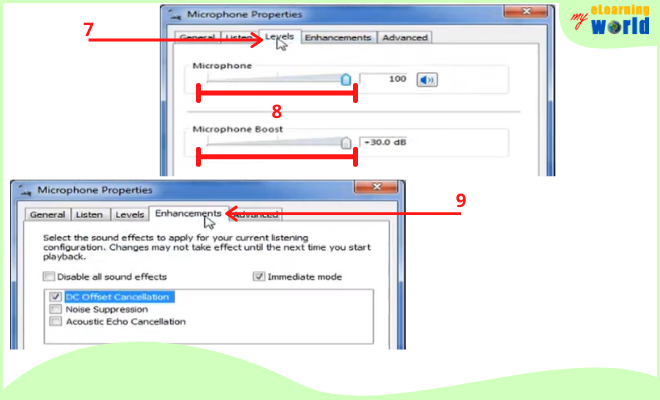
- A new window will open with additional tabs. Select the tab labeled “Levels”.
- The “Levels” tab will provide you with options for “Microphone” and “Microphone Boost”. Use the slider controls to raise or lower the gain.
- You can also select the tab labeled “Enhancements” if available. This tab will provide you with additional mic controls that may include noise cancellation features for additional control over mic gain and sensitivity.
As with Windows 10, you may not see all of these settings in Windows 7 due to differences in audio driver properties and microphone manufacturer specifications. If you are unable to find all of these settings when trying to adjust sensitivity or input gain, contact your mic’s manufacturer.
Useful Resources
- Understanding Microphone Sensitivity
- How to read microphone specifications
- How to Connect a Microphone to Your Computer
- Microphone Test
- The Best Voice Over Microphones
- What is a dynamic mic?
- How to clean a microphone
- How do wireless microphones work?
Final Thoughts
Although software can help when making adjustments to mic sensitivity, you should also consider your recording environment.
A device that is sensitive by design, such as a condenser mic, will produce better results when used in a recording studio that has been acoustically treated as opposed to being used in a noisy recording environment.
This is also good to know if using your mic for Zoom meetings and other online chat purposes.
By combining the right model and the right recording environment with the knowledge of how to adjust microphone sensitivity, you can have better control over your recording experience and the quality of your audio.
Have any questions about how to change mic sensitivity on your computer? Comment below and we’ll help you out.

