As someone who’s created countless eLearning experiences over the years, I’ve often found that screen recording is one of the best ways to easily create engaging video content that resonates with learners. Whether you’re crafting tutorials, presentations, interactive eLearning modules, or you just want to add audio to Google Slides or a PowerPoint presentation, capturing on-screen activities can make your content more relatable and easier to follow.
Don’t believe me? Consider this — studies show viewers retain 95% of information when it’s presented in video format compared to just 10% if it’s delivered via text only.
So, if you’re using a Windows computer and wondering how to seamlessly record your screen (with audio!) for your eLearning projects, you’re in the right place. From third-party screen recording tools to built-in features already included in Windows, let me walk you through some simple yet effective methods to get the job done.
The Best Ways to Record Your Screen on Windows
You don’t need to have any technical skills to do this simple task. Here are some tips for how to screen record on Windows with audio and video included:
Use a Professional Screen Recording Tool
VEED is the fastest and easiest way to make high quality, professional videos for eLearning, business training, sales presentations, and other applications.
In my opinion, VEED is the best way to record your screen on Windows with sound.
VEED is a screen recorder that makes it super easy to capture your screen and quickly create videos that you can share with students, colleagues, clients, employees, or whoever else you want to share them with.
This screen recording tool is web-based, so you can easily access it from your Windows computer. Mac options are available as well, but since this article is focused on how to screen record on Windows, I’ll leave that aside for now.
Its intuitive interface ensures that even those new to screen recording can easily navigate and produce high-quality videos without a steep learning curve.
One of the things I really like about VEED is its versatility. Not only can you record your screen, but you can also integrate slides, use text-to-speech functionalities, and even record via webcam. This multifaceted approach ensures that content creators have a range of options to make their videos more engaging and tailored to their audience’s needs.
For eLearning professionals, this means the ability to create comprehensive tutorials, blending live demonstrations with slides and voiceovers for a holistic learning experience.
Moreover, VEED’s cloud-based sharing and collaborative features are a boon for teams. Instead of juggling large video files, everything is stored and shared directly from the browser. This streamlines the review and feedback process, allowing for real-time collaboration and edits.
Plus, with its great collection of editing tools, from adding subtitles in multiple languages to integrating sleek templates and effects, VEED ensures that the final video output is not only informative but also visually appealing.
Key Features:
- Intuitive Interface: User-friendly design for easy navigation.
- Versatile Recording: Capture screen, integrate slides, and record via webcam.
- Text-to-Speech: Convert written content into audible speech.
- Cloud-Based Sharing: Store and share videos directly from the browser.
- Collaborative Features: Real-time collaboration and feedback directly in the cloud.
- Editing Tools: Comprehensive suite for trimming, flipping, resizing, and more.
- Subtitling: Add and edit subtitles in multiple languages for enhanced accessibility.
- Templates & Effects: Enhance videos with sleek designs and visual effects.
- Free & Paid Options: Flexible plans to suit various needs and budgets.
- Cross-Platform Compatibility: Works seamlessly on Windows and other platforms.
Click here to try VEED for free or check out our VEED review to learn more.
Try the Built-In Game Bar App on Windows
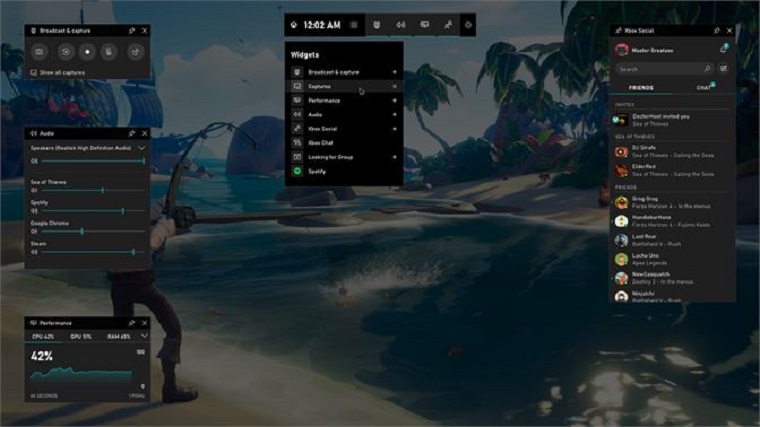
Game Bar is an app built into Windows 10. While the point of this Windows screen recording app is to capture footage of games you’re playing on your PC or streaming from your Xbox, it can easily record activity from other apps on your computer.
Here’s how to set it up and use it: Settings > Gaming > Xbox Game Bar, and then simply Enable Xbox Game Bar. Or you can also use the Windows search feature to locate this app on your computer.
Using the Game Bar app, you can record in most applications and windows, but not in all of them. You won’t be able to capture the Windows desktop or File Explorer, as well as multiple program windows, using the Game Bar app. If you want to teach someone how to complete a task that involves numerous programs, you’ll need to do multiple separate videos. If you want to teach them how to do something using the Start menu in Windows 10 or 11, you’ll be unable to do that too.
Additionally, because this is a free built-in app for screen recording on Windows, it is limited with features like editing and sharing your videos.
Some users have also warned that the Game Bar app also uses a lot of your computer’s resources, so it may not be ideal for recording high-quality videos or playing games and recording at the same time.
Key Features:
- Record games on your PC or streamed from your Xbox console
- Record your screen on Windows in most applications
- Available on both Windows 10 and 11 by default
- Free to use
Useful Resources
- How to screen record on HP laptops
- How to screen record on a computer with audio
- Download Xbox Game Bar
- How to disable the Xbox Game Bar
Have any additional questions about how to screen record on Windows with audio? Comment below and we’ll help you out.