As an instructional designer who’s recorded more eLearning modules than I can count in my home studio, I can tell you that when it comes to recording, clarity is crucial. Unfortunately, even the best microphones can sound muffled, and this problem can kill an otherwise perfect recording.
To make matters worse, if you aren’t monitoring your recording using a good pair of studio headphones, you may not even notice that your recording sounds like underwater until you get your audio into post for editing.
Once you hit this stage, you may play your audio back only to be left wondering: “Why does my mic sound muffled?” This creates a huge problem because, although there are software tools available that can restore some muffled audio, you very well might have to go back and re-record a session that can’t be fixed due to muffling.
The good news is I’ve learned multiple strategies for tackling this problem that I’m going to share with you below.
Easy Steps For Clearer Audio
A muffled sound can stem from internal problems within the recording unit itself (make sure you’ve actually cleaned your microphone before doing anything else), but they can also be the result of your recording environment, gear placement, and more.
When a mic sounds muffled, the details of your recording often end up destroyed, and once recorded this way, even the best post-processing tools and techniques can have a hard time bringing them back.
Below are some common causes for your device sounding muffled and how to fix them:
Your EQ Settings
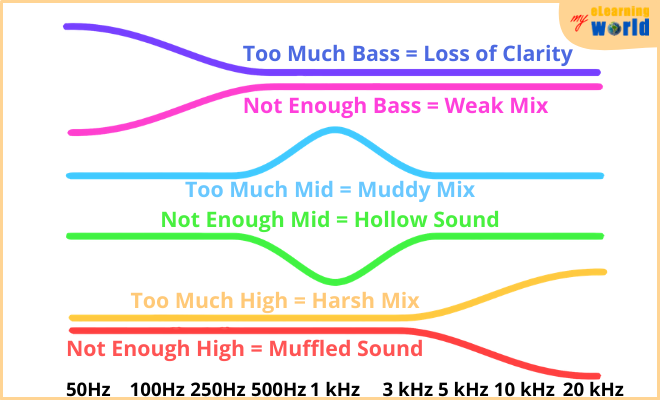
EQ, also known as equalization, is the process by which you raise or lower frequencies in a recording. Your EQ settings allow you to manipulate your audio by giving it more bass, mid-range, and treble. This can be done with broad bands, narrow bands or even tiny bands that are specific to one frequency.
The problem is that raising bass too much can cause a recording to sound muffled or muddy. Lower frequencies tend to take up a lot of head space within a recording. When too much bass is introduced, clarity suffers because too many tones are competing for your audio space at once.
How to EQ to Remove Muffling
EQ settings will be specific to your sound source and the complexity of your recording.
For example, if you’re recording the human voice, you will want to roll off bass frequencies below 100Hz. That’s because even baritone voices won’t reach much further below this mark, and by cutting, you give yourself more room to accentuate mid-range frequencies without raising them. This prevents harshness while reducing muffling and brings overall clarity to a voice.
If you’re recording specific instruments, you’ll want to temper your EQ settings for each one individually.
Bassy instruments, like kick drums and bass guitars, already have bass to them, so you may experience muffling and muddiness if you raise low EQ levels. Once again, it’s almost always better to cut frequencies than to raise them, so consider cutting mid- and high-end frequencies instead of raising lower frequencies.
If you’re recording multiple sound sources that have a broad range of frequencies at once, consider using a frequency spectrum analyzer plugin to see where hot spots may be developing during your recording session. This tool will give you a visual representation of where frequencies are peaking so that you can narrowly define your EQ settings and cut specific low-end frequencies to reduce muffling and mud.
Something is Blocking Your Port or Capsule
Another possibility that could lead to a muffled sound is something physically blocking your microphone.
This could definitely be the case if you’re recording using a smartphone or laptop mic that has a small port. If debris blocks the port, sound waves have a harder time penetrating, and this can cause your recording to sound muffled.
Additionally, if you’re using a windscreen or other type of cover, the thickness of the material matters. If your covering is too thick, it won’t let enough of the short high-end frequencies through, but bass tones can still penetrate. This causes muffling because you’re only capturing the lower frequencies that give a foundation to the clearer mid- and high-end sounds.
Use the Appropriate Windscreen
To solve this issue, make sure your ports are clear of debris, and use the appropriate windscreen for your specific device. Also, make sure you even need a windscreen before using one. If you’re recording in a studio environment that has been properly treated with acoustic paneling or in a vocal booth that has sound deadening-material applied, using a windscreen if likely going to result in a muffled recording.
Your Audio Source is Too Close, Too Far, or Off-Axis
Perhaps one of the most common answers to the question “why does my mic sound muffled?” is that your sound source is too close. This is especially true when you’re recording with a condenser microphone that offers greater sound sensitivity or with a headset microphone that’s placed very close to your mouth.
The problem with being too close to a device while recording is that sound can overwhelm the capsule in a condenser mic and lead to a muffled, distorted recording. This can be an issue when recording the human voice, but it can be a problem when recording instruments as well.
You may also experience this problem if your audio source is not facing your recording device properly.
When using a cardioid polar pattern, the capsule is only picking on sound from one direction. If your sound source isn’t facing the mic’s capsule, your recording could sound muffled because the recording is going to pick of various reverberating reflections from walls, ceilings and other surfaces in your recording space.
Even if you think that a surface isn’t reflective of sound, virtually any hard surface will reflect at least a little bit of sound. Believe me, these reverberations all stack up in tiny amounts and can cause muffling when they bounce back to your microphone.
How to Solve the Problem
To remedy this, position your sound source appropriately to match your selected polar pattern. If you’re using a cardioid pattern, only direct sound toward the front of the capsule. Also, choose your distance based on the type of mic you’re using and the volume of your audio source.
- If you’re recording the human voice at a normal speaking volume, try to maintain between six and 12 inches between your sound source and your microphone
- For situations involving recording multiple sounds at once, consider the use of multiple recording devices and a multi-track recorder to capture and process each sound source individually for greater clarity
- When recording loud sounds, consider the use of a dynamic mic instead of a condenser. Check out our guide explaining how dynamic microphones work.
- Choose the right polarity pattern for your needs, and keep your sound source facing the proper direction during recording
Muffled Mic Issues With the Blue Yeti
I also wanted to highlight some tips that specifically pertain to muffled sounds and the Blue Yeti. It’s an incredible piece of gear that offers a lot for podcasters, voiceover artists, YouTube content creators and more, and I consistently rate it among my top picks whenever it’s included in my reviews.
However, if you’re experiencing muffled mic issues with the Blue Yeti, here are some things you’ll want to look at:
- The Blue Yeti utilizes a condenser capsule, so it needs to be positioned between 6 and 12 inches from your sound source for the clearest results in most cases
- You want to keep the Blue Yeti either mounted on a desktop or mounted in a shock mount while recording with it. Holding the mic during recording can lead to discrepancies in positioning and proximity to your sound source, both of which can result in muffled audio
- Another consideration for getting the cleanest audio from the Blue Yeti is the condition of your USB cable. If your cable is damaged or is not making a tight connection, you may experience some ground noise that results in a low-level hum. While this doesn’t cause physical muffling, it can result in your recording sounding muffled as the humming will take up aural space in the background
Monitor Your Recording
I also recommend that anyone who has the ability to monitor during recording should do so. Many microphones include an onboard headphone jack that gives you the ability to hear what’s being recorded in real-time. By monitoring while recording, you can catch potential problems and correct them before getting too deep into a recording session.
You’ll want to use neutral studio headphones while monitoring for the best results. If your headphones are tuned for bass, you may hear more bass than actually exists in a recording. This can cause you to make unnecessary adjustments that can alter the final recording in a negative way leading to muffling. Likewise, headphones that are tuned for top-end sounds may not allow you to hear problems in the low-end until you’ve already finished recording and your audio is in post-production for editing.
Final Thoughts
Lastly, I also want to point out that you may need to make a few adjustments and test them over time to find the right settings and placement to solve the muffled audio problem. Recording is a precise and complex blend of testing and comparing results, and audio pros have spent many years honing their craft by trying things out and creating innovative solutions.
This is why many audio professionals are able to solve other problems quickly, including microphone issues with high-pitch noise.
You should also keep in mind that audio is subjective to a degree. What sounds muffled to you might sound fine to someone else.
As a result, try not to overthink things, and when possible, bring in someone else to take a listen to your recording to see if they hear what you hear. Having a second set of ears to give an objective listen can help you to get a better understanding of how things sound when you may be too close to the project.


